Home Blog Page 21

Maybelline Matte Lipstick | Vivid, Bold, Rosy & Liquid Mattes

4
Maybelline Matte Lipstick Collection | Review & Swatch

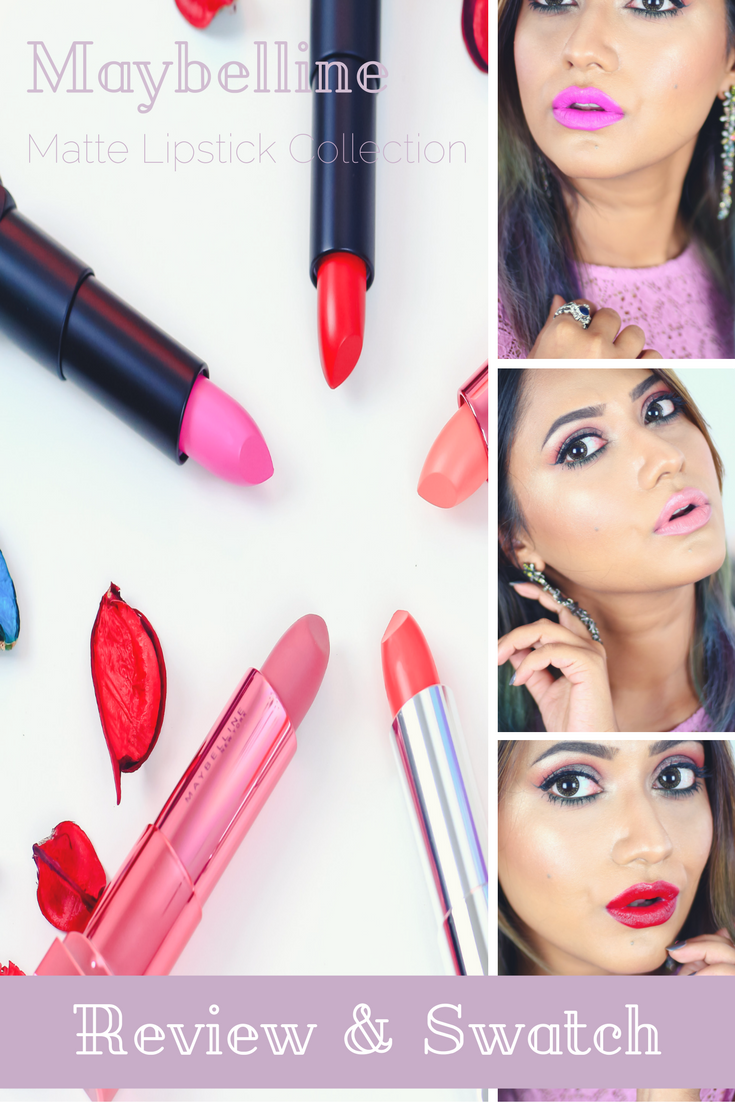
Another lipstick swatch post today and I have 7 lipstick here with me from the Maybelline Matte Lipstick Range. Maybelline launched this whole new range of Matte lipstick here in Malaysia this October with an aim to make the Matte lipstick the TREND! Although, I had one Rosy Matte and a Vivid Matte for a few months now but the rest are new in my dresser.

I’m happy that drugstore brands are concentrating more on matte formula nowadays. After all, me personally like the shine of my highlighter not on my lips. I think a Matte Lipstick is always easy to carry and more flattering at any time of the day. What is your opinion?


Maybelline Matte Lipstick | Vivid, Bold & Rosy Mattes

Maybelline Matte Lipstick | Review & Swatch

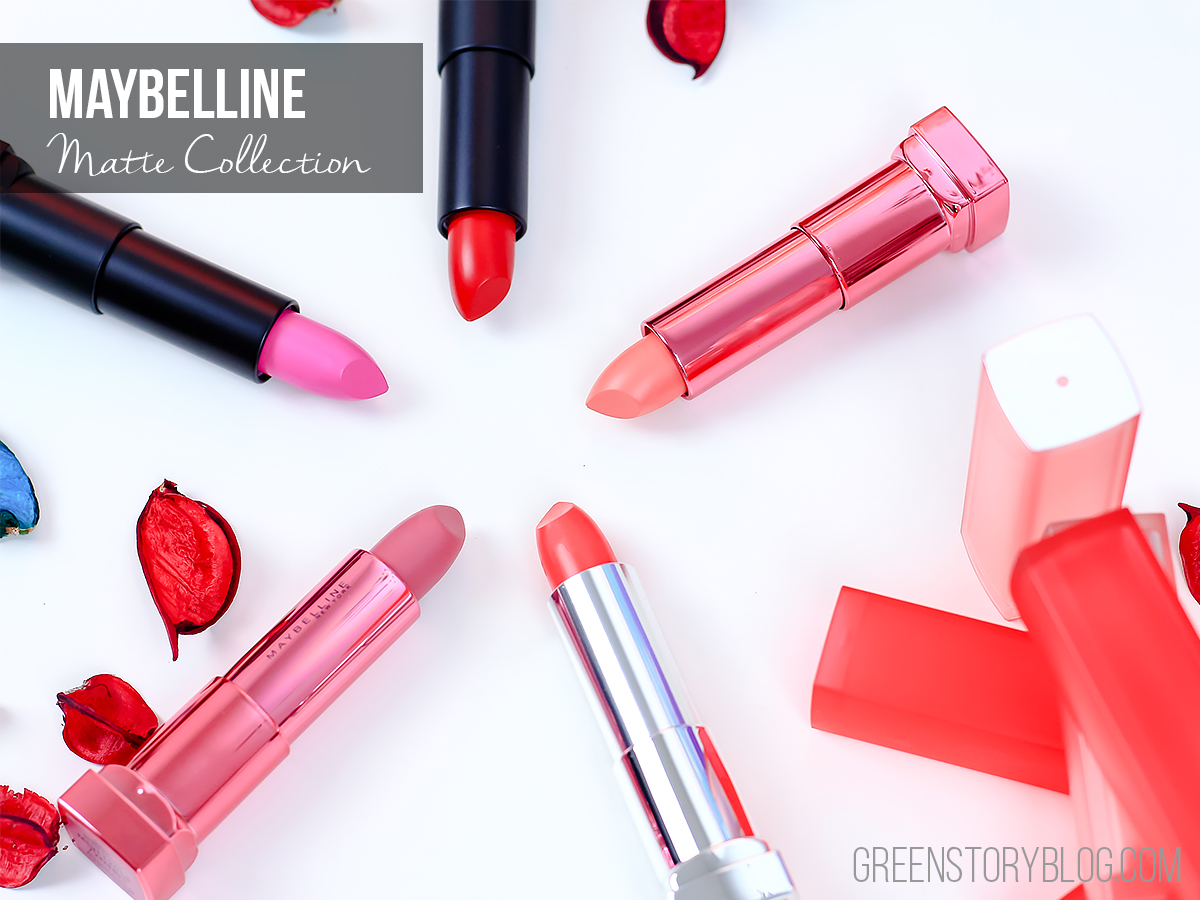
Maybelline has following 3 variety of matte Lipstick…

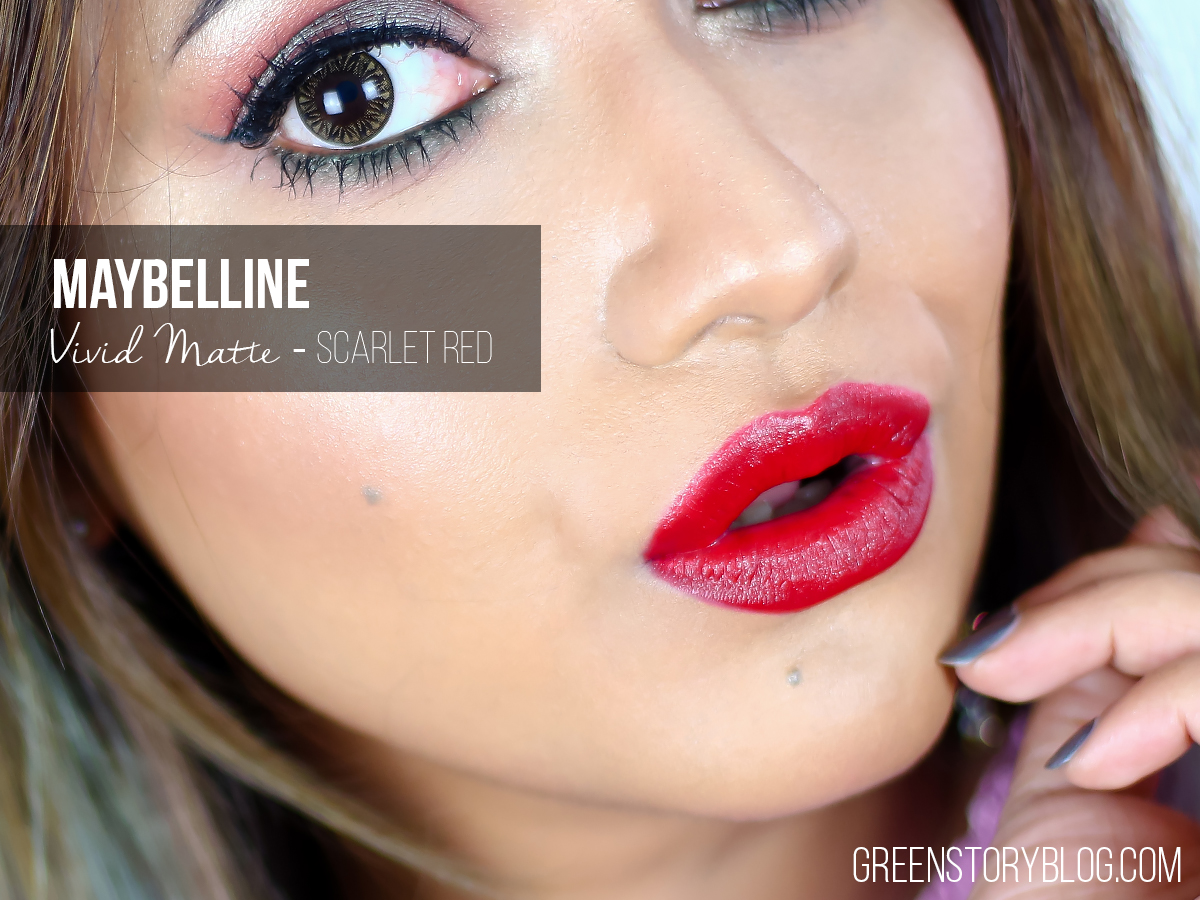
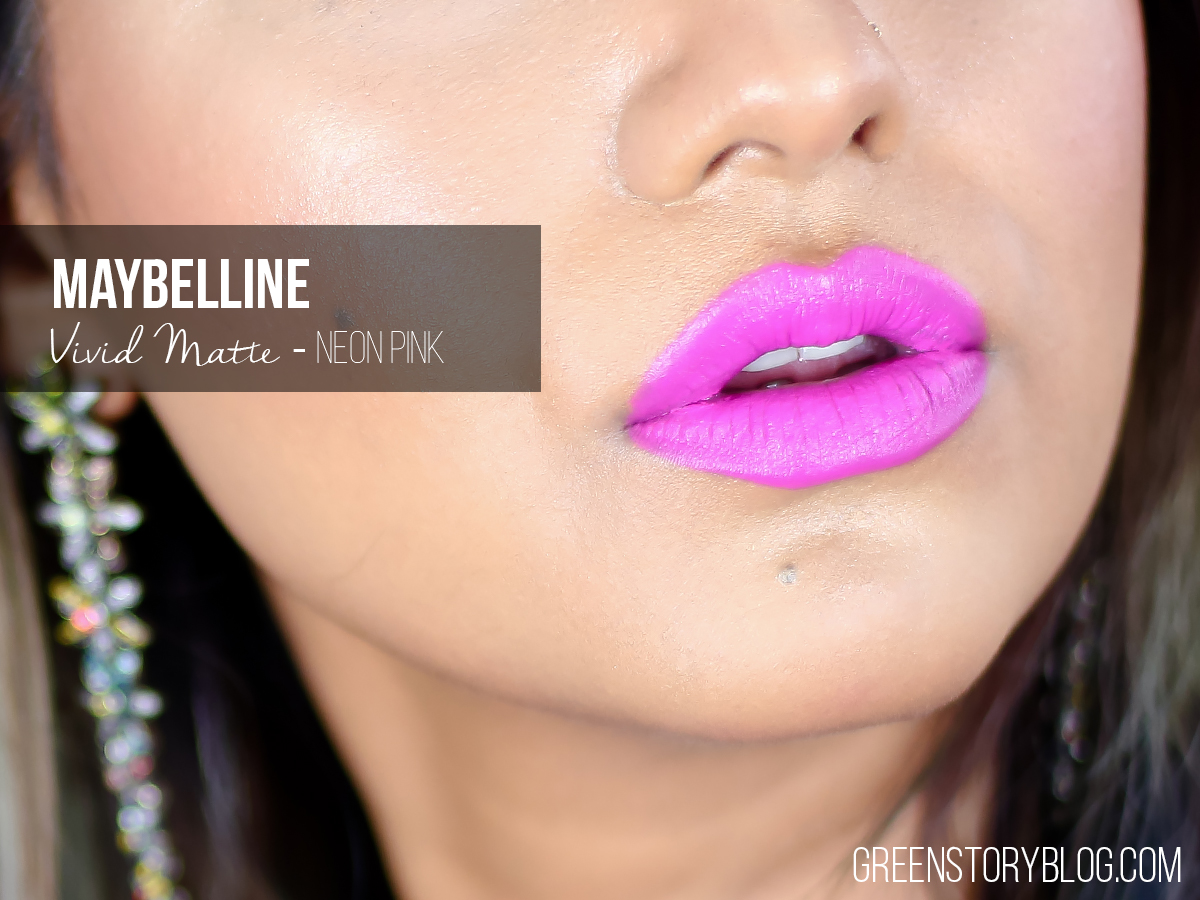
  • Vivid Matte – total 3 shade in the range. I have 2, Scarlet Red and Neon Pink
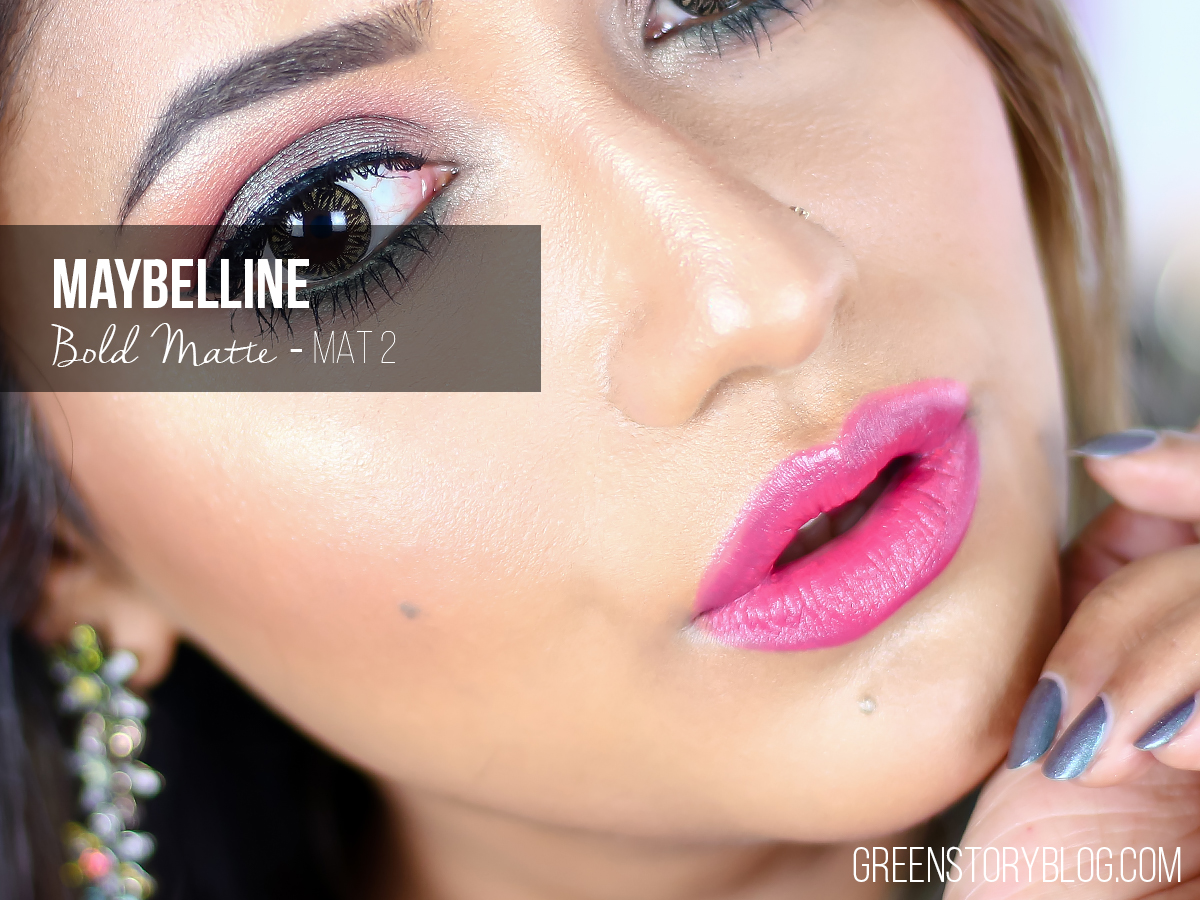
  • Bold Matte – total 7 Shade in the range. I have 1, MAT 2
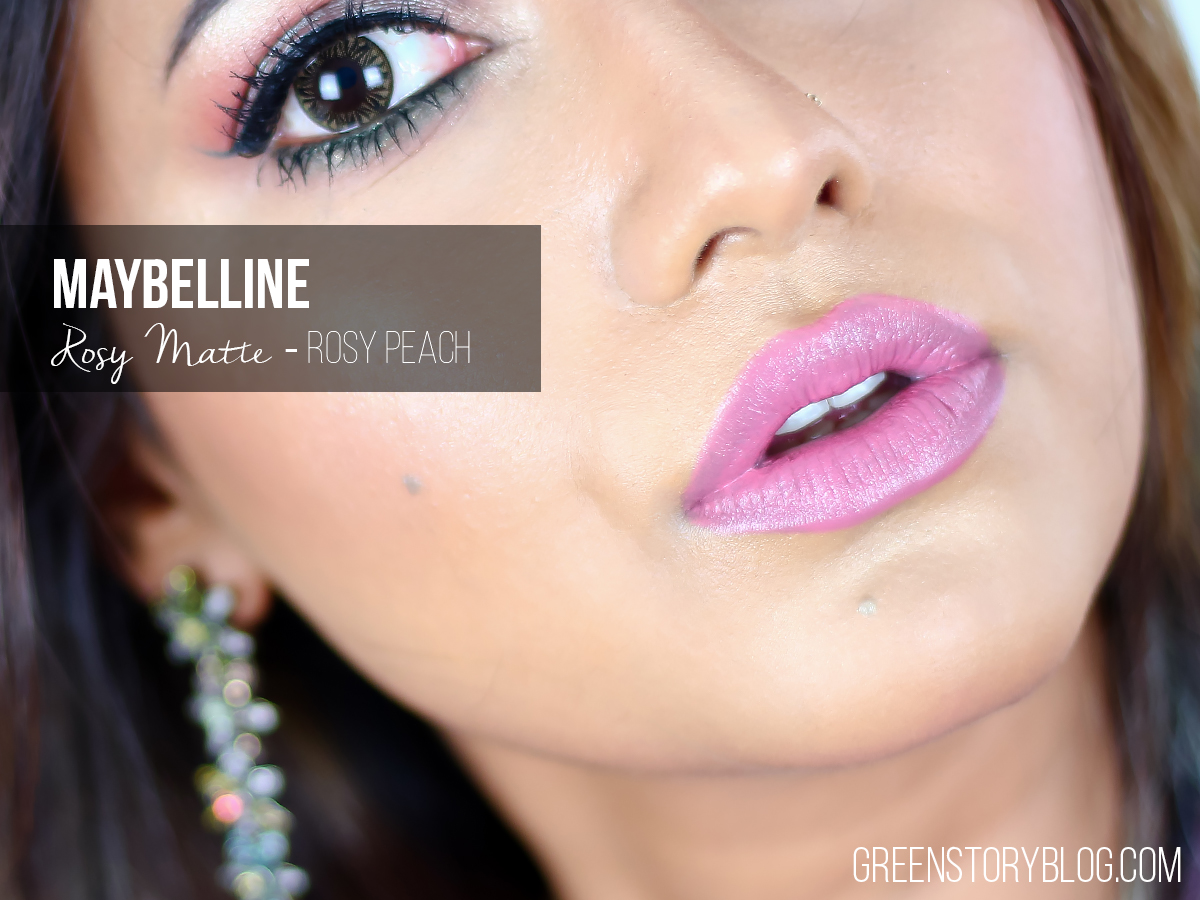
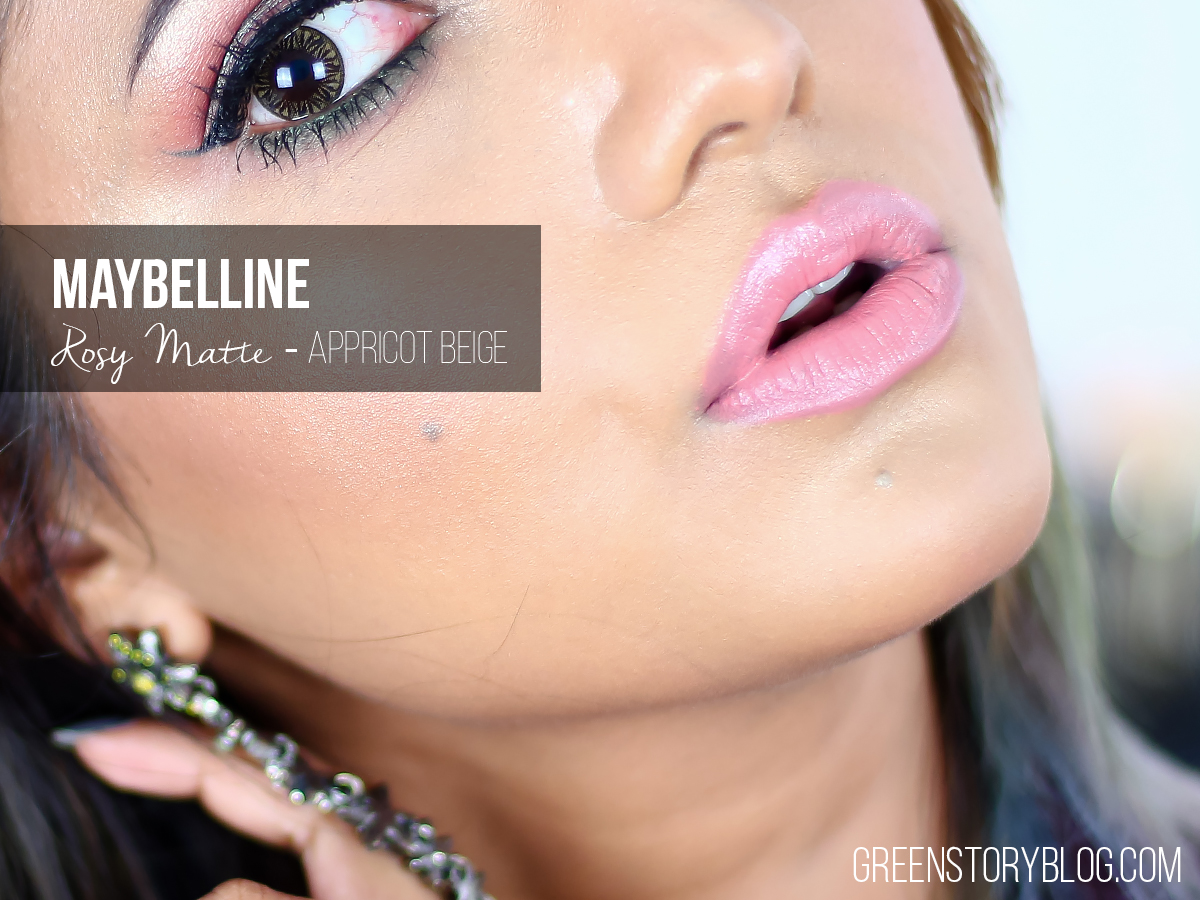
  • Rosy Matte – total 4 shade in the range. I have 2, Rosy Peach and Apricot Beige

The question is… are they same? or they differ somehow?!

Packaging wise, they are color coded. Black tubes are Vivid Mattes, Silver one is Bold Matte and the shiny rose packaging is Rosy Matte. Rest is all same.

Let’s talk about the actual product!
First of all the packaging, there is nothing to complain about but they are pretty in my eyes. These lipstick doesn’t smell anything and I won’t address them as a matte formula but semi-matte. The all are nicely creamy, glides on easily, applies evenly and last on the lip for a decent time. The each type differs on pigmentation only. Vivid Mattes are the most pigmented one thus I love this range the most. Bold Mattes & Rosy Mattes has just the regular creamy pigmentation.


Swatches of Maybelline Vivid, Bold & Rosy Matte Lipsticks on my lips are below…

Maybelline Vivid Matte Lipstick - Scarlet RedMaybelline Vivid Matte Lipstick - Neon PinkMaybelline Bold Matte Lipstick - MAT2Maybelline Rosy Matte Lipstick - Rosy PeachMaybelline Rosy Matte Lipstick - Apricot Beige

[wp_ad_camp_3][/wp_ad_camp_3]

Maybelline Vivid Matte – Liquids

Maybelline Liquid Matte Lipstick

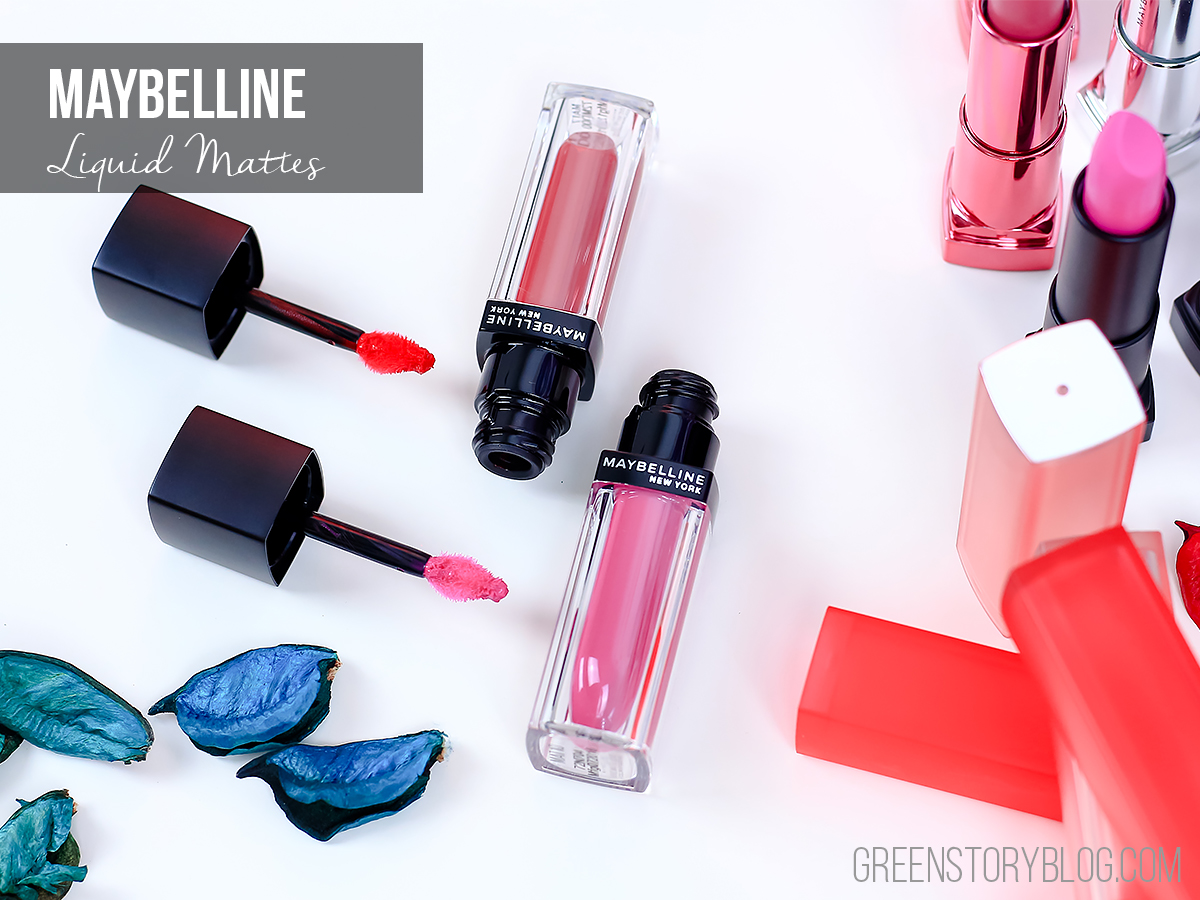
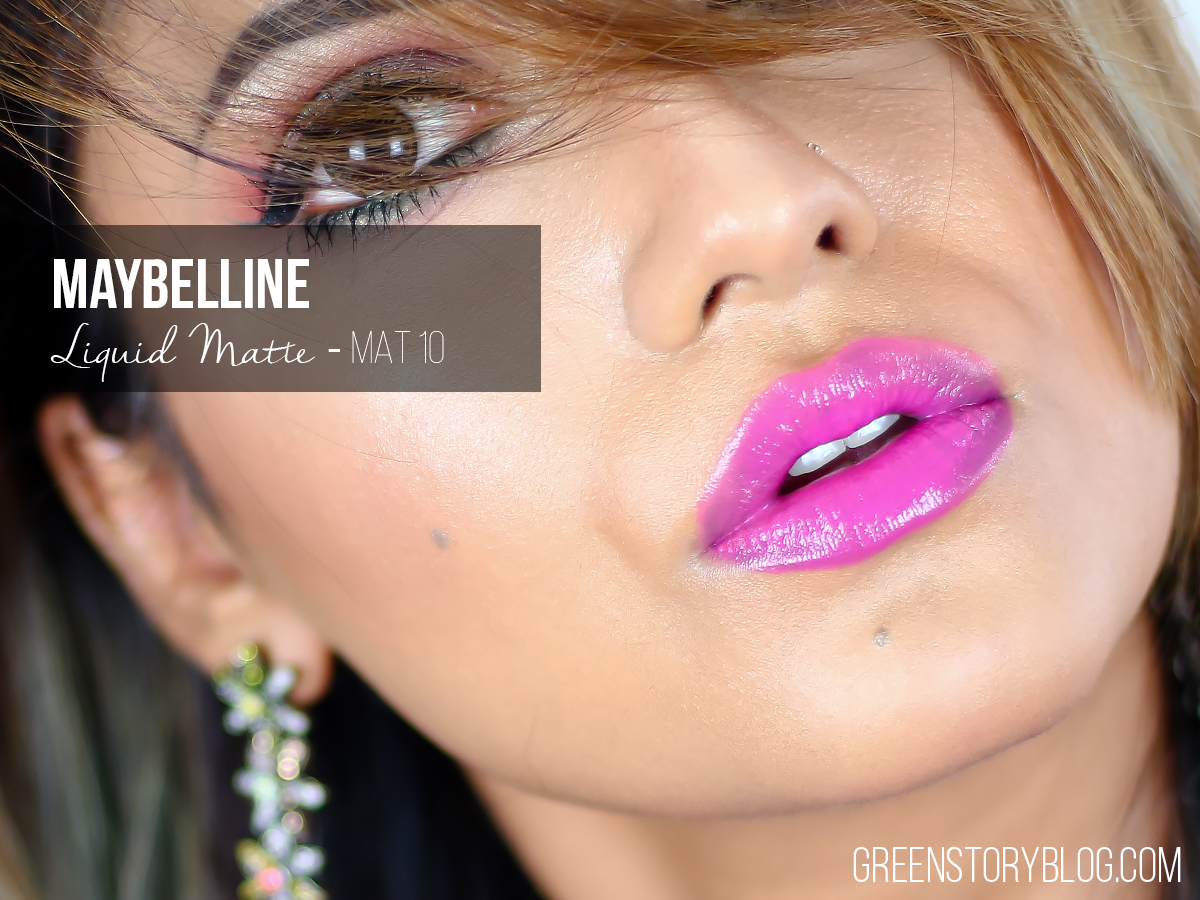
I have here two shades of Vivid Matte Liquids, MAT 7 (a classic red) & Mat 10(hot pink). They have 10 shade variety available in the market. I like the sleek glass-like packaging and the doe foot applicator has a good quality so the ease of application is assured. They don’t smell anything either.

These Maybelline Matte Liquids clearly reminds me of their last year release, Velvet Matte (review here) Liquid Lipstick. I didn’t find any difference in the formula, shiny gloss but very pigmented compared to a gloss. In fact, the packaging is all same like before, just the label is different. I feel these are just the re-promotion of the same product, however, I’m not sure if the shades were the same in velvet mattes.

Just the way I wondered last year, the same feeling for these Vivid Matte Liquids as well. I can’t understand why would someone call these glossy glosses a matte formula! Other than that, as a gloss these are fantastic. feels non-sticky on lips, doesn’t bleed or so, and has good lasting power. Leaves a light stain on lip if you wear them for a while and that stain is easily removable with a makeup removing wipe.

Swatches of Maybelline Vivid Matte Liquids on my lips are below…

Maybelline Liquid Matte Lipstick - MAT7Maybelline Liquid Matte Lipstick - MAT10

[wp_ad_camp_4][/wp_ad_camp_4]

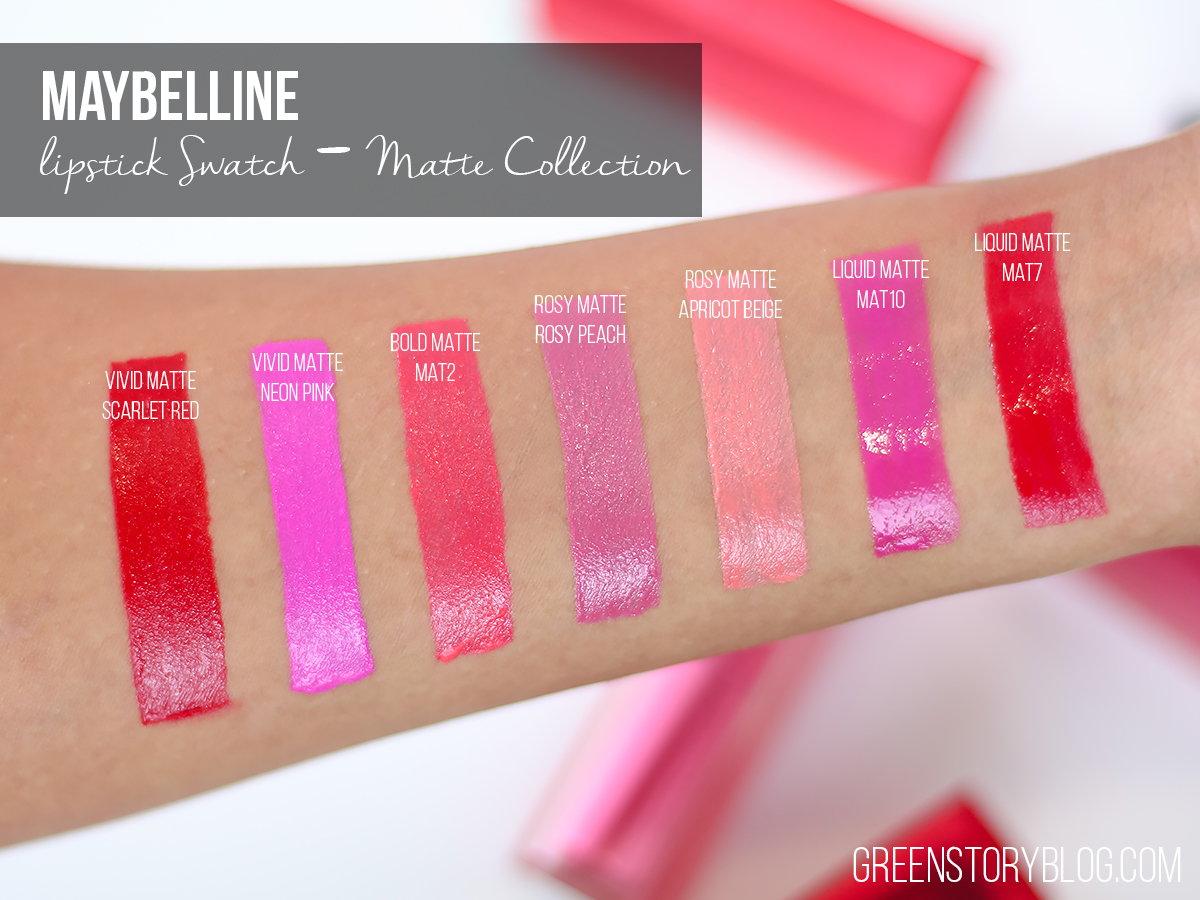
For you convenience, the swatch of all on my hands is below…

Maybelline Matte Lipstick Swatch


Overall, these new Maybelline Matte lipsticks are surely a budget-friendly option for a day to day use. I wish Vivid Matte range had more shades than just three. Their pigmentation touched my heart the most among all these Maybelline Mattes. In the other hand, those who like a glossy tinted lip, I’m sure, those Liquid Mattes gonna win their heart.


[color-box]

Shopping Info:

Maybelline Vivid, Bold & Rosy Matte Lipstick | 27.90 RM
Maybelline Vivid Matte Liquid Lipstick | 29.90 RM

Available at Watsons, Guardian and most of the leading pharmacies, Nationwide.

[/color-box]

*** Some products are PR Sample. 

[signoff][/signoff]

Korean Skincare, Hair & Makeup Haul | Althea Halloween Bucket

4

My ‘Number One’ Korean skincare, hair & Makeup shopping destination Althea never misses to please me and this time, it was a Halloween surprise 👻  A couple of weeks ago received a big gray paper wrapped package (inside it was the charming Pink-box, as always) from Althea. Be aware you guys, I got some super potent ghouls, I mean products with me!

Althea is preparing for Halloween so now they have a lot of creepy (finely cute in my eyes) products to shop from skincare, hair to makeup. When it comes to Korean skincare, to be precise,I truly feel they always wins the ‘Fun Fact’. What do you think?

Without further ‘bloodcurdling’ let’s talk about my new Korean skincare, hair & Makeup haul and quick thoughts on them…

[wp_ad_camp_4][/wp_ad_camp_4]

Mamonde Rose | Moisturizing Sheet Mask | RM 6.00

Mamonde Rose | Moisturising Sheet Mask

Remember my previous article when this year in May Mamonde launched here in Malaysia. Absolutely love this floral inspired brand and their sheet masks are amazing for the price. Yes yes, Mamonde products are also available in Althea.

This particular rose mask is a punch of rosy refreshment. If your skin is dehydrated or you passed a rough day indulge your evening with this rose mask. You’ll feel recharged within jus 15 minutes.


Elizavecca Hell-Pore Clean Up Mask | RM 42.00

Elizavecca Milky Piggy Hell-pore clean up Mask

This is a peel-off mask with 4% of activated charcoal. Apart from the cute piggy packaging, Elizavecca Milky Piggy Hell-Pore Clean Up Mask also works well on extracting pores. don’t have blackheads but I’m sure if you’re suffering from a strawberry nose this can help you out.

The mask is gray in color and has very good adherence in it. It stings my eyes just after application (not sure why) but that goes away after 30second or so. Dries on the skin within 6/7 minutes and once peeled comes off easily without tearing apart. So I can say its a mess free one. Although this product claims to works the best as a nose pack but I kinda liking it for my whole face.


Piolang Monster Pack | Face Lifting Mask | RM 53.00

Piolang Monster Pack - Face Lift Mask

Monster Pack… how Halloweeny it sounds! This is the most attractive ghoul of this haul. The packet instantly made me curious when I fist saw this but I was completely unaware of its monster power untill I tried it out.

In the package, you get a pot of powder, liquid activator in a bottle to mix the powder, a cute spoon, a silicone-ish pot to mix the ingredients and a mixing/applicator brush. Now, I couldn’t read the amount of product it comes with because all are written in Korean.

Piolang Monster Pack - Face Lift Mask

The pack is instructed to mix in a 1:1 ratio. I prepare the pack as instructed for my face and neck. Apply using the applicator brush. The liquid smells very nice on its own but when both mixed together it’s not really that pleasant. Fortunately, they don’t smell that strong either.

In my first use,  after the application of 2 minutes felt nothing but in the 3rd minute, I started feeling why it’s call ‘Monster Pack’. I’ve never experienced such tightening effect with a mask before, in a good way! I let the mask dry (not fully) for 7/8 then wash them off. Taking off the mask is slightly messy, you better use them before shower :p
The liquid/activator is a post-mask toner as well. Skin feels nice and relaxed when applied after the pack.

As you can see in the pack(picture above) that it is a face lifting mask so a tightening effect was expected. But I’m pleased to see that the pack cleanse every bit of dead cell from my face and also give an instant brightness. I’m looking forward to using Monster Pack once every week now. Not only for the face but I added this mask to my hand and feet care routine. After all, who doesn’t like a crease free hand and feet 😀

PS: Do not apply this near your eyes. I won’t suggest this mask to anyone who is under the age of 25. The tightening effect it gives can be too aggressive to young skin.

[wp_ad_camp_3][/wp_ad_camp_3]

Piolang CP-1 Ceramide Treatment Protein Repair System | RM27.00 for 25ml

Piolang CP-1 Protein Clinic (Ceramide Treatment)

How interesting is this syringe packaging of CP-1 Ceramide Treatment Protein Repair System? A perfect adornment for your shower for this coming Halloween, hehe. It’s a hair mask that you use in the shower. The mask contains hydrolyzed keratin, collagen, a mix of 17 amino acid and 5 kinds of vegetable oil.

You don’t need much of this treatment pack. I’ve used it before in a smaller (syringe) size that lasted me approx 3 use. After shampooing take a generous amount out of the syringe (according to your hair length) so you can lightly cover the hair up. Concentrate more at the damaged end. Leave your roots alone if your scalp is oily. Wait for 3 to 5 minutes then rinse off.

The mask repair and nourish my damaged hair (if you read my previous article then you know how damaged my hair is!) so well. The effect of this protein pack last in my hair for two days so I’m using it 1 to twice a week nowadays.


Velieve Bellamonster Crayon Color Blender Set | RM 85.00

VELIEVE Bellamonster Crayon Color Blender SetVELIEVE Bellamonster Crayon Color Blender Set

This is a super fun lipstick set that comes with 6 pen-stick in a beautiful black cardboard box. The set includes 3 pigment- stick (red, orange & pink) and 3 blending (black, lilac & white) shade. You can use three pigment stick on their own and mix those blending shade to create you desired shade. It’s amazing that this set actually offers an uncountable shade range. How? …just by controlling intensity. Suppose, you can create a baby pink by mixing pink and (approx 80%) of the white shade and a natural pink by mixing the white and pink in a 50/50 ratio. If the pink and white mixed with a bit of black then you’ll get a nice mauve lipstick. Sounds fun enough? I’m yet to experiment with this fully. Planning to post a full customized lip swatch in a separate post. Otherwise, this haul post will be too long, no?
Stay connected, ok?


[color-box]

Shopping Info:

Get your Korean skincare, hair & Makeup supply from Althea➡️ Visit Here
You can also receive an additional discount of 5RM[using my code ‘ GreenStory’] + 30RM[new signup credit]

Want to save some more?
Shop Via ShopBack (read all about my ShopBack experience) to get up to 10% cashback.

[/color-box]

[signoff][/signoff]

Opalescence Go Teeth Whitening Kit | Does it work?

6
I tried Opalescence Go Teeth Whitening Kit and this is what happened...

No matter how much you beautify your face if your teeth aren’t clean and white enough then you’ll lack confidence. Do you think the same way? I’m always obsessed achieving pearly white teeth, that goal is kinda impossible for a coffee addict anyway. Hence the need for an easy to use teeth whitening product. Earlier this month I got to try the Opalescence Go Teeth Whitening 10-day Kit [10% Hydrogen Peroxide].

Opalescence Go is the professional alternative to over-the-counter whitening options. It’s a simple, fast, and great-tasting way to start a whitening treatment or for whitening touch-ups. With no impressions or custom trays necessary, Opalescence Go is ready to use right out of the package! Opalescence tooth whitening gel contains PF (potassium nitrate and fluoride), which helps maintain the health of enamel throughout the whitening process.

Opalescence Go Teeth Whitening Kit


Opalescence Go Teeth Whitening Kit available in a 5-day or 10-day kit. They have also a variant of 6%, 10%, and 15% peroxide [ Peach, Melon & mint flavor] so you can choose the right one according to your teeth sensitivity.

As I mentioned earlier, I have the 10-day kit, Melon 10%. The box comes with 10 pre-filled, disposable trays that contain whitening gel [Hydrogen peroxide] in it. They are super easy to use. You just have to take the tray out from the initial packaging and put it on your teeth.

Inside the colored layer of the tray, there is another transparent tray, containing the gel, which will stick to your teeth. Once the inside tray is perfectly set on teeth the outer colored tray will come off easily. As because the inside tray is generously thin so it is easy to keep in the mouth without worrying about the displacement of the gel.


Opalescence Go Teeth Whitening Kit

Experience with Opalescence Go Teeth Whitening Kit:

The kit [10%] is advised to use 30minute every day, 10 days in a row. My teeth aren’t sensitive but my mouth is. I can’t keep anything in my mouth for long, not even toothpaste, I feel vomit. You can guess, it isn’t easy for me to use such product kit that needs to put in my mouth.

In fact, let me tell you a past story. I’ve tried other teeth whitening product [dont want to mention the brand name, a hyped one with light thingy] last year and that was an epic fail. Those don’t come with a disposable tray or anything, just the gel in a syringe, a normal silicone tray to apply the product and the light thingy to put inside the mouth as long as the treatment is advised. I was hardly able to use that kit only twice and my money has gone waste.

Opalescence Go Teeth Whitening Kit is quite user-friendly compared to my previous experience.

Because of the disposable tray and no need for light. It is way easier and comfortable in the mouth. However, the melon flavor did bother me slightly at the beginning of use.

I tried Opalescence Go Teeth Whitening Kit and this is what happened...

To start with, my teeth are not that yellow but there is a yellow tint. Although I do take care of my teeth as much as I can. I maintain routine cleaning and scaling every 3 months. However, I’m at a bad level of coffee addiction and our desi-food (with a lot of turmeric and spice) doesn’t allow me to keep up the white level of my teeth.

In the first use [30min, one tray], I did notice a change of shade. My teeth felt shiny and less yellow than before but not overly tint-free. I kept using the kit for next three days in a row but due to my Eid Holiday, I had to put it on a break. Later on, won’t lie, I finished the kit by using it every other day. Failed to be regular as it was advised, sigh! Fortunately, I was able to notice the difference and how the Opalescence Go Teeth Whitening Kit was working. My teeth are definitely way too whiter and brighter than before [picture above]. I also have previous teeth whitening experience by a dentist and if I compare the result, this ‘at-home’ kit surely nothing less than that. So far, the kit didn’t occur any teeth sensitivity issue either.


End thought about Opalescence Go?

No doubt, Opalescence Go Teeth Whitening Kit is a great, user-friendly, and convenient product. Not everyone can handle a regular teeth whitening product but Opalescence Go has you covered in that perspective. Moreover, going to a dentist is pricey where this kit does the job with an ease.

PS: I would love to know your recommendation on a teeth whitening product if you tried any 🙂 comment down below!

[color-box]

Shopping Info:

Opalescence Go Teeth Whitening Kit – 10 days | RM 550 (approx)
***Dispensed only by a licensed dental professional. Look for the product in your nearest dental clinics. For more info, you can visit Opalescence website on their FB page.
To find a dentist near you browse here.

[/color-box]
*** PR Sample.

[signoff][/signoff]

Easy To Use 3-in-1 Lipcare Solution | Mentholatum Lip Fondue

4

Mentholatum Lip Fondue, it’s as delicious as it named. They come in two different types, Aurora (with 3D sparkling pearls) & Classic rose. They’re lip balms in general but quite unique in their types. How? Mentholatum Lip Fondues are your 3-in-1 lipcare solution in a chapstick form. They are functional as a lip balm, lip essence, and a lip mask. Both of their variants are enriched with Jojoba Oil, Olive Oil, Royal Jelly Extract and Honey that ensures proper nourishment and hydration that our lips are thirsty for.

Mentholatum Lip Fondue also provide sun protection so you can be carefree whenever you using them.

[wp_ad_camp_3][/wp_ad_camp_3]

Easy To Use 3-in-1 Lipcare Solution | Mentholatum Lip Fondue | Aurora

The sticks are designed with a dial-lock tube (you can’t twist them back in) which makes it very convenient to use. They have a thick jelly-ish texture and both smells like candy (artificial candy flavour). At first, when I saw them I thought they will give some tint but they don’t. They’re colourless but highly glossy. I actually like less glossy tinted lip balms more. The thick formula melts a bit upon application but they don’t bleed or goes here and there.

In my lipcare routine, I normally use BurtsBees chapstick or lip balm, and Laneige Lip Sleeping mask (review coming soon). I find Mentholatum Lip Fondue good as a lip balm/ lipcare product and an overnight mask, just the way it claims. I’ve been loving using them when I’m at home but I don’t wear them out. I feel it looks a bit too thick to wear them out. Best use, in my opinion, is wearing them as a lip mask at night because they really work well keeping the moisture locked at night time. As because they come in a stick so they are convenient to use rather than dipping a spatula into my Laneige Lip Mask pot.

I didn’t find anything bad about them, in fact, they’re a good alternative to lip mask (if you’re a fond lip sleeping mask or so) if I judge the price. I like them both however, Aurora (pictured above) turns out to be my favourite because of how delicious and mild it smells.

Mentholatum Lip Fondues are definitely worth a chance in your lipcare routine.

[color-box]

Shopping Info:

Mentholatum Lip Fondue | RM 17.90
Exclusively available at Guardian.

[/color-box]


*** PR Sample.
[signoff][/signoff]

5 things to know before opting for a GREEN hair | Hair Color Idea

6
5 things to know before opting for a GREEN hair

Hair coloring has been an addiction to me ever since. I get bored too quickly of my dark brown hair and even when I feel a bit low first thing that comes to my mind is ‘let’s change the hair’. Not good at all for hair but we have only one life right? Moreover, the hair will grow new with time so hair color is a ‘Yass’ always. Nowadays I’m totally into green hair, ombre to be more specific. I find green really goes with my skin tone but it’s not really easy to maintain like other usual colors. However, it took me a bit of trial and fail to reach the perfect ‘green hair’ point and maintaining it. So today’s article is about ‘5 must-know facts’ from my experience that you should know if you’re thinking to go green with hair.


1. Pre-lightening process:

Hair Pre-Lightening process

Unless you have a natural light/blonde hair you’ll have to go through the pre-lightening/bleaching process. It will depend on your hair health, how damaged are they or if they’re in the condition to take the bleach. Do expect damaged hair after the bleaching process. Especially, if you have dark hair like me then the hair takes a lot of time (which means more bleach and damage) to lose color. No matter how expert the hand is who’s dealing with your hair you’ll get the damage. So be prepared for that.


2. Know your hair type:

Gray Black Ombre Hair

It is very important to know what is your hair type and what type of color can suit you. My hair type is extra fine hair, quite unusually thin. Like, my 20 hair strand is similar to one normal hair strand. It’s not that I’ve very thin hair but I simply born with such fancy hair. Thus, my hair is very stubborn when it comes to color. No matter how much you feed them they won’t be fulfilled with the desired opacity. And sometimes they might go in a totally different direction.

In the picture above you seeing I’ve done black and gray ombre hair, but I didn’t. This was my first attempt at green hair. After pre-lightening my hair specialist applied green hair dye (was a softer tone of green, Shiseido Aqua Matte – 11 to be more precise) but my hair declined that badly and I ended up getting a black-gray ombre hair for that day. This wasn’t bad, I got to rock such dope hair color (quite trendy now in Asia) for a week :p
So, do expect such experience as well. I did go to the salon to get my green hair after 8/9 days as I was told.


3. Choosing the right professional for a perfect ‘Green Hair’ outcome:

Green-Hair-Color-4

The first time I did my green hair was this (the picture above), A cool toned deep sea green and quite popping. I did like the color at the end however, this is not what I expected. The pictures I collected and showed to my stylist as a suggestion was totally different (just like the pictures below, my next green hair) compared to the outcome. I’m not sure if it was my failure to make him understand my desire. Additionally, it did bother me big time when the color came out wrong (black gray ombre) in the first place. After all, the hair colorist should’ve known the color fact.

Needless to mention, for the current green hair I switched my previous stylist (yes, had to pay a bit more as well) and got just the perfect blend (last picture) of green ombre hair.


4. Limit of hair wash:

Green Ombre Hair

Within my experience, I can say regardless of everything the color green last way to less than other colors. To mention red-based color last for a surprisingly long period of time. Last year when I did pink hair color and purple, later on, both of the colors lasted me more than 4 months. The green tends to last only two weeks. First time I didn’t care about my hair washing limit, washed my hair almost every day and so within two weeks it was all gone.
Recently (the picture below) I’m limiting my hair wash to 3/4 times a week (using products for color treated hair) and the color seems to hold up well. However, I don’t think my recent color will last more than 3 weeks.

Green Ombre HairGreen Ombre Hair


5. Damage Control:

Green Ombre Hair

I did my first green hair 5 months back. When the color was gone I changed my hair (couldn’t take the coppery tone hair for long) back to dark brown. But my lust for that perfect muted green kept bugging me. Before deciding to opt again for the green I knew I’ll have to go through the pre-lightening process again so I started taking care of my damaged hair. We usually take care of our hair after the damage but if we take the precaution then it is possible to prevent damage to some extent.

Two weeks I spent recovering the health of my hair as much as possible then went to the salon for a new color. Loved my recent green hair and obviously, my hair is pretty spoiled again but who cares as long as I can revive it (wink wink) with a bit of care.

What do you think? Isn’t my green hair looks gorgeous? I didn’t notice before taking the picture that my hair has grown quite long as well 🙂


Just now came up one thing in my mind! Don’t we see a lot of people with virgin hair (hair that never been F***ed up with dye or bleach) giving advice on how to prevent damage? At this point, I’m finding it hilarious, words flowing into my head, “do you even know what damage is?’ ..haha never mind! just a random thought.
Anyways, let me know if you’re interested to know how I’m taking care of my F***ed up hair and keeping it alive 🙂 I would love to share my hair care routine with you.

New Laneige BB Cushion Pore Control VS Whitening | Swatch and Comparison

28

This year at the end of June, Laneige launched their newly formulated, in a futuristic way, 3rd Generation BB Cushion. The way the Laneige BB Cushion compact look, sleek and holographic, you’ll instantly fell in love with. Laneige introduced two types of cushion compact so everyone can find a perfect match according to their needs.

Honestly, I’ve never been a fan of cushion compact before. Mainly because of the limited shade range but this time there was a change, they had my shade (happy dance)! I’ve been trying them out ever since I got them in hand and now I’m here to share my experience with you guys.

Laneige BB Cushion - Pore Control


The new Laneige BB Cushion features 3 key factors:

  • 3D Skin Fit Cushion
    The newly improved cushion is strong and with just enough elasticity which allows you to pick up the desired amount of product easily and evenly with the puff. The BB liquid adheres lightly and thinly onto the skin providing a transparent makeup look.
  • Super Flex Lasting
    This new feature intensifies the long-lasting effect of smooth and even skin texture by the anti-darkening film layer. The anti-darkening film layer works automatically when applied, concealing facial wrinkles and protects makeup all day keeping up the brightness.
  • Hydro Ion Mineral Water
    The new BB cushion is now upgraded with Laneige’s signature Hydro Ion Mineral Water that contains 6 minerals (Manganese, Magnesium, Zinc, Calcium, Potassium, and Sodium) and 3 essential vitamins (A, C, and E) which assures hydrated skin all day and more lasting power.


Laneige BB CushionLaneige BB Cushion

What are these new technologies of Laneige BB Cushion?

To talk about this new Laneige BB cushion I’ve to tell you about their two new types. These two different types of Laneige BB cushion explains the new technology in their formula.

  1. BB Cushion – Whitening
    – incorporates the patented Sparkling Coat Technology with the application of Magic Pigment System. The pigment system uses micro-sized pearls with two different color schemes (white or silver). White pigment offers bright glowy look while silver offers a moisturizing radiant look, also deflects light by 360 degrees.
    Water coating technology of this one provides a moist and smooth complexion for a natural dewy look. It also claims to brighten the skin from inside for its Melacrusher technology.
  2. BB Cushion – Pore control
    – offers two-step oil control while minimizing pores and blurs out the uneven skin texture. Its dual powder formula controls sebum and gives a semi-matte, a soft and glowy look that lasts all day long.

Apart from those major differences both type of the BB Cushion has broad-spectrum sun protection(SPF50+ PA+++) and claims to be water resistant.


How about the BB cushion shade range?

For the first time in my knowledge, Laneige BB Cushion is offering a vast range of shade with undertone variety. They are available in total 8 shade, 6 shade (13, 21, 23, 31, 33, 35) in neutral/warm undertone and 2 shade (13C, 21C) in cool tone. I’ve matched my skin with the shade 35(Coffee) and got both types; Whitening and Pore control to try them out.

Laneige BB Cushion | Pore Control and Whitening

My Experience with Laneige BB Cushion:

First of all, when I found out Laneige BB cushion is offering deeper shades, that pleased me right away. Until now I was unable to find any BB cushion that doesn’t look white in my tawny skin. While I was trying them out in the launch event I was impressed by the finish of the Pore Control one right away thus I started using that one first. After a week or so I tried out the Whitening one.

Pore control one works just the way it claims. Once applied it does visibly smooth out skin and uneven skin tone, gives a semi-matte finish, feel super lightweight and last throughout the day. The whitening one also works the same way as it claims. Gives dewy finish, hydrating on the skin and long-lasting. None of them gives any white cast either.

Laneige BB Cushion Pore Control annd Whitening Shade 35 Swatch

These BB cushions are meant to give natural/transparent coverage. However, I find the Pore-control one gives a bit of better coverage than the Whitening one. I tried to wear the BB liquid in a layer for a fuller coverage; again Pore control one builds better while the Whitening one remains almost in the same translucent coverage. For the dark blemishes/spots I’ve, I was spot correcting them with a concealer.

The BB cushion doesn’t really need to set with powder after application but for my habit, I do set them with my Ben Nye Neutral Set Powder and surprisingly they don’t lose their luminous characteristic (especially the Whitening one) even after setting the base with powder.

Although these BB cushions are long lasting, after 5/6 hours I do get some oiliness in my T-zone and sometimes my smile lines get slightly obvious(those happy days when I laugh too much). But with Laneige BB cushion retouching has never been so easier! Trust me, you can just touch up with the cushion directly and it looks refreshed right away without giving any cakiness.

Another user fact I must mention about this new Laneige BB cushion,

I usually don’t like to use the puff that comes with it (only use it when I’m retouching) probably because I like the old school foundation application method. Also, it feels unhygienic to use the puff over and over this is I use my beauty blender. Although beauty blender soaks up a lot of product that the puff it comes with yet I find the beauty blender is easier to clean after every use.


To conclude both of the Laneige BB Cushion,

I believe, those who have flawless to almost flawless and young skin they’ll love the Laneige BB Cushion – Whitening. For my not-so-young and flawless skin, I love Laneige BB Cushion Pore Control more. I’ve used quite a lot of high-end to drugstore BB/CC creams so far. For everyday makeup, with a high SPF50+, this is the best product I’ve used so far. My current one is almost finished and I’m surely going to repurchase it.


Shopping Info:
Laneige BB Cushion Whitening | RM159 (15g X 2)
Laneige BB Cushion Pore Control | RM159 (15g X 2)

Available nationwide at Sephora, Aeon, Isetan, Parkson, or any Laneige Boutique.


If you’re interested in knowing more about BB Cushions, then do read my experience with Laneige anti-aging BB cushion. I’ve compared the anti-aging BB cushion formula with Laneige pore control and whitening cushion formulas.

If you’ve tried all the BB cushions by Laneige then let me know by commenting the name of your favorite one.

Green Story - A Malaysia Beauty Blog

5 things to do in Cameron Highland | Short Trip Destination in Malaysia

4

Last month in the Eid holiday I and husband decided to spend some quality time that is surrounded by greenery and calmness. Without any doubt, in Malaysia, there is no best option that is close to KL other than Cameron Highland. There was another plus point while deciding, whether of Cameron Highland is cold (slightly hot in the mid-day) thus, the best place for a quick refreshing trip. We set our wheels for the next 3 days.

Cameron is just approx 375km away from KL. The first 100km you can pass within an hour but once you get into the Cameron region (literally hills all around) you can’t drive more than 30/40km speed because you’ll face curve in every 30 seconds. There the road gonna kill your time, it took us around 4hours to reach the city.

In holidays, I believe the state gets more visitor so it gets way too crowdy. The main city, Tanah Rata, comes before the tourist spot. We did a big mistake booking our hotel, not in Tanah Rata but close to tourist spots, Brinchang.

We booked our stay at Copthorne Cameron Highland Resort (375RM/night) seeing the high rating of the resort and that sadly turned out a total disappointment. First of all, after the city, there is only one road goes to all destination and so it was ridiculously jammed with traffic. 15 minutes of road took us 2 hours to cross and reach the hotel. Secondly, the environment of the resort (nothing like the way you see in the website picture, surroundings are simply ugly and disturbing) and our room wasn’t good enough either, old and kinda dirty looking bed furnishing pissed me off right away.

I changed the room twice but then realized it’s the same everywhere. Anyways, don’t want to mess up with my mind now thinking about that hotel (If you’re planning to visit Cameron I highly recommend you to avoid Copthorne) but want to get to the good parts…

So, mindblowing chilled weather there in Cameron that will refresh you within a moment even after the long drive and what else you can enjoy? My five best suggestions are…

1. Boh Tea Plantation
BOH Tea Plantation panview

Main attractions of Cameron Highland are the Boh Tea Plantation. Apart from Sabah tea (which is more loved among the tea lover) Cameron tea’s are well known for their aroma and quality. There are quite a few popular tea plantations in Cameron, such as Bharat Tea (Cameron Valley Tea House and Farm) however, we decided to visit BOH Tea Plantation. This one is not as big as Bharat Tea but comparatively nice and less crowded. The view there was simply mesmerizing as well as the drive to the plantation.

Within the Boh Tea Plantation, there is also a museum where you can see how they process the tea or the old machinery. A cafe and product display store on the top of the hill was pleasant as well. We sat there for an hour or two, enjoying the serene view while tasting out some fresh tea.

I realized, to enjoy the tea plantation to its fullest you must take your time. I mean you should at least keep half of the day(I would suggest the morning part) for this site only.

2. Strawberry Farm
Cameron Highland Agro Tourism | Strawberry Farm

Strawberry farms are everywhere in Cameron Highland and you’ll literally get tired of eating fresh strawberries and other foods made of strawberries. They’re quite cheap on the farm compared to how strawberries are priced at KL. Within the strawberry farm, you’ll also find other veggies like latus, tomatoes, grapes, mints, cabbages and all growing together. And obviously, everywhere you can pick things from the tree on your own.

3. Cactus Farm in Cameron Highland
Cameron Highland Cactus Farm

I love the look of the cactus farm. I’ve never seen so many varieties of cactus before. Some of the giant ones did stun me for a while. This is definitely a place for the cactus lover. When I was giggling seeing all those colorful thorny creatures my husband got poked by a few and he wanted to leave the place as soon as possible. Best part you can buy your favorite cactus from the farm at a very cheap price. I got a few small ones!

4. Lavender/Flower Farm
Cameron Highland Lavender Farm

Lavender and flower farms are very popular in Cameron highland. Unfortunately, these aren’t the actual farms but just a display spot for tourist. You’ll get to see various j=kind of lavender and other flowers. You can also pick flowers from the garden to buy, on your own. There are also a bunch of cafes and other small food shops to calm down instant hunger. I honestly didn’t enjoy the flower farms much, moreover, these places were way too crowdy.

Cameron Highland Agro Tourism | Roads

If you really like driving then leaving the Lavender farm behind drive (to the left) another 10-15 km more toward the Jalan Gua Musang. On the way, you’ll get to see some real farm, warehouses, and hilly agricultural scenario. Quiet roads, the cold breeze will surely take your mind away. On the way, you’ll also find a BH petrol station, in case you need to fuel up. I really wish we had some more time to explore these farms.

5. Mount Gunung Brinchang – Cameron HighlandMount Gunung Brinchang - Cameron HighlandWatch Tower of Mount Gunung Brinchang - Cameron Highland

This is one of the must-visit attraction in Cameron Highland. The highest (2030m)mountain, Gunung Brinchang. Some who are adventurous type they like to hike to the top but you can also drive (as we did) to the top watch tower. There is a very narrow and curvy road to the top, you must be a good and careful driver to drive there. You can’t exactly reach the end of the top because the TM tower station is there but just before that there is a small watchtower for visitors. I and husband enjoyed the view a lot and this was totally worth out one and half hours of risky drive.

Miscellaneous Activities in Cameron Highland

All tourist site stays open up to 6pm only so in the evening there was nothing much to do in Cameron Highland. A few local markets stay open for a bit long so in the evening you may want to browse them for fresh veggies or plant. Boiled/roasted sweet potatoes are the most interesting street food I found there. They were uber sweet than usual potatoes I tested before. Steamboat buffet dinner seemed to be very popular there with very cheap pricing (the one we tried costs only 35RM/person). At the last day of our stay, I bought quite a few plants to bring home with me. And of course, as a souvenir, you can buy dry flowers like lavender, tea, and flower essential oil.

Other than these there are also a lot more attractive in Cameron like bee farm, butterfly farms etc. You might enjoy those as well if you are an insects lover.


Cameron Highland Travel Tips:

If you planning to visit Cameron Highland make sure you’re a good and safe driver or your driving partner is. You can go there by bus (which is quite cost effective) then hire motorbike there as well. Every hotel/resort there also offers package day trip, however, I don’t think a day is enough to enjoy the natural beauty there. Plan your journey ahead so you can manage time better, and to avoid driving around at the night. Trust me the curves are scary :p

Have you been to Cameron Highland? What are your favorite places in Cameron? Share in the comments.

PS: Till I pen down my next travel post, you can read up the article about MUST-HAVE holiday beauty essentials post.

Clinique 3 Step Skincare System | 3 Minute Twice A Day For Better Skin !?

36

Skincare shouldn’t be complicated. The right product with the right amount should be enough. We all know about the vital steps of skincare; cleanse-tone-moisturize yet with Clinique it is Cleanse-exfoliate-moisturize with just three simple product that takes only 3 minutes. We all always in a quest to find the right skincare regime, aren’t we? And then the 1000 variety of products offered by varieties of brands makes us confused, we keep trying this and that and then sometimes we mostly waste a humongous amount of time/money without getting that expected result. The 3-Step Skincare concept by Clinique is surely unique and effective either way. I’m glad that I finally got on the bandwagon a month ago.

What is this 3-Step Skincare System?
As I mentioned earlier, cleanse, exfoliate and moisturize. Clinique offers a simplified 3-step skincare system with its 3 simple products; a cleanser, an exfoliant, and a moisturizer which are curated for every skin type. In a clinique boutique, you’ll always get help to analyze your skin and choose the right system/product for you. You’re to use them twice a day, which takes only 3 minutes each session and you’ll get clear, smooth, and radiant skin with the lowest effort.

In my session with a Clinique advisor, I was advised the 3-Step skincare system for dry-combination (I knew my skin type earlier as well) skin. After using them for a month now I’m here to share my thoughts on each of the products and how the ‘3 minute twice a day for better skin’ concept actually works.

First of all, packaging-wise, there is nothing to complain about or be overwhelmed about. They are nice sturdy and user-friendly. I love the simple, lightweight plastic packaging. Let’s talk about the product…


Clinique Liquid Facial SoapClinique Liquid Facial Soap - mild - for Dry Combination skin

Ingredients:
Water, Sodium Laureth Sulfate, Sodium Chloride, Cocamidopropyl Hydroxysultaine, Lauramidopropyl Betaine, Sodium Cocoyl Sarcosinate, Tea-Cocoyl Glutamate, Di-PPG-2 Myreth-10 Adipate, Aloe Barbadensis Leaf Juice, PEG-120 Methyl Glucose Dioleate, Sucrose, Sodium Hyaluronate, Cetyl Triethylmonium Dimethicone PEG-8 Succinate, Tocopheryl Ethyl Succinate Ethyldimonium Ethosulfate, Butylene Glycol, Chamomilla Recutita (Matricaria), Hexylene Glycol, Polyquaternium-7, Laureth-2, Caprylyl Glycol, Sodium Sulfate, Edta, Disodium EDTA, Sodium Benzoate, Phenoxyethanol

 
My Experience:

Even though it is a liquid face soap but it has just the right consistency, not as liquid as water. Glides on very easily and very much water-soluble. Doesn’t later up into a foam and a perfect companion for facial cleansing brushes like Clarisonic. Easy to rinse off as well. Although this is a mild formula it melts and cleanses every bit of dirt and oil from the face without drying out my skin. Skin feels nicely clean, fresh, oil-free, and comfortable after every wash. I’ll surely admit this liquid soap helps to balance out the oil on my face quite effectively.

I need just two pumps for my full face and neck and it does the job. It’s been a month, using it twice a day (morning and evening) and I’m yet to reach half of the bottle. I find it really good for the price.

Clinique Clarifying Lotion Twice A Day Exfoliator 2Clinique Clarifying Lotion - Dry Combination

Ingredient:

Water, Alcohol Denat., Glycerin, Hamamelis Virginiana (Witch Hazel), Acetyl Gluco-Samine, Menthol, Trehalose, Sodium Hyaluronate, Butylene Glycol, Disodium Phosphate, Phenoxyethanol, Red 6, Red 33, Violet 2

 
My Experience:

Among the three products of the Clinique 3-Step Skincare System, this clarifying lotion is my favorite.
After washing my face with the cleanser I follow up with the clarifying lotion. I take just the generous amount (3 pours, the bottle mouth is open) in a cotton pad and then swipe all over my face and neck just once (the way I was suggested by the Clinique SA).

This is actually an alcohol-based (I was told the amount of alcohol is just sufficient and ‘cosmetic grade) exfoliant that helps to de-grease the skin and sweeps away dry/dulling flakes of skin. It feels cooling (probably because of containing menthol) on the skin and makes the skin ready to absorb further skincare products better. This product also feels nothing different than a regular toner to me, I honestly find it as the best toner I’ve used so far.

Clinique Clarifying Lotion is fragrance-free but you’ll get the scent of alcohol once the bottle cap is opened. Some skin might get irritation because of the alcohol but my skin kinda loves it. I find my T-zone is well oil-balanced ever since I’m using this.

Clinique Dramatically Different Moisturizing Lotion+Clinique Moistirizing lotion for Dry to Combination skin

Ingredients:
Water, Mineral Oil, Glycerin, Petrolatum, Stearic Acid, Glyceryl Stearate, Sesamum Indicum (Sesame) Oil, Urea, Lanolin Alcohol, Triethanolamine, Hordeum Vulgare (Barley) Extract, Cucumis Sativus (Cucumber) Fruit Extract, Helianthus Annuus (Sunflower) Seedcake, Propylene Glycol Dicaprate, Sodium Hyaluronate, Butylene Glycol, Pentylene Glycol, Trisodium EDTA, Phenoxyethanol, Yellow 6, Yellow 5, Red 33.

 
My Experience:

Although my skin is dry-combination ( my T-zone is too oily, my under eye is always dehydrated) and this product is suggested for this type of skin, however, I find it a bit too much thick for my skin. After using the Clarifying Lotion, I take 2 pumps for my face and neck (as I was suggested), massage and blend into my skin. Just after the use skin feels great, non-greasy, smooth, supple and soft but after 30 minutes my T-zone starts feeling heavy. Thus, for the last couple of weeks, I’m using only one pump for my face and neck and it seems to work better as I lower the portion of the product. I love that the formula is fragrance-free (although I don’t have any problem with fragrance) and good for the dry parts of my face but next time I’m thinking to switch it to their moisturizing gel.

Overall, I’m pretty impressed with the Clinique 3-Step Skincare System. It truly makes a difference as it takes less time/product for complete skincare but keeps my skin healthy. However, as I’m in my late 20s and already got fine lines under my eyes so I couldn’t ignore using an eye cream on top of this skincare system.

[color-box]

Shopping info:

Clinique Liquid Facial Soap | RM89
Clinique Clarifying Lotion Twice A Day Exfoliator  | RM89
Clinique Dramatically Different Moisturizing Lotion | RM 156

They are available at any clinique boutique or Sephora, nationwide. You can also purchase them online from their website.

[/color-box]

*** PR Sample.